how to make a kvcd or in other words how to get 700meg avi file down to about 450megs to make a vcd without any picture lossso youve download a movie its in avi format you want to watch it on your dvd player so you reencode it it comes out to about 1100 maybe 1200 megs so you got to split it and save on 2 disks well the following tut will show you how to do it on one disk first you are going to need some tools
virtualdub
CODE
http://heanet.dl.sourceforge.net/sourceforge/virtualdub/VirtualDub-1.5.10.zip
heada3che
CODE
http://mitglied.lycos.de/darkav/download/headac3he-0.23a.rar
and some dlls
CODE
http://mitglied.lycos.de/darkav2/download/MPAlib_MMX-1.00(1.50).rar
http://mitglied.lycos.de/darkav2/download/ssrc_MMX-1.01(1.28).rar
http://mitglied.lycos.de/darkav2/download/Vorbis_MMX-1.20(1.74).rar
http://mitglied.lycos.de/darkav2/download/Lame_enc_MMX-1.28(3.93).rar
http://mitglied.lycos.de/darkav2/download/MP2enc_MMX-1.15(1.13).rar
put the above dlls in the same folder as heada3che
besweet
CODE
http://dspguru.notrace.dk/BeSweetv1.4.zip
http://dspguru.notrace.dk/BeSweetGUIv0.6.zip
put these 2 in the same folder
you will have to have nero as well but im hoping you have that already if not it on this forum
tmpegnc
again its on this forum
you will need some templates
CODE
http://www.kvcd.net/dvd-models.html
right click all the pal templates if your dvd player is pal or ntsc if ntsc save them to the template folder in the tmpegnc folder so to begin open virtualdub goto file
open video file
locate the avi file you want to convert
if you get a warning ignore it
click the audio button at the top
make sure source audio and direct stream copy have a black dot next to it
goto file
save wav
now you have to call this with a .ac3 extension
for example view from the top.ac3
i would save this in the same file your avi is
so youve named it press save
box will open let it do its thing this is taking the sound from the film
now press audio and select no audio
you should have a black dot next to no audio and direct stream copy
goto video
select direct stream copy
goto file save as avi
save the file what you want again put in the same folder as the original avi
to make life easier i call mine the film title no sound ie viewfromthetopnosound
press save
this is now saving the film without sound
you can now close virtualdub
open besweet
scary looking box appears
dont worry heres what to do
at the besweet.exe locate the besweet folder it will show besweet.exe in the enter file name box
click on this and at the bottom it will say valid press ok
now goto input and find the ac3 file we just made you will need to change the enter file name from .Lst to .ac3
double click on the ac3 file you made and at the bottom it will say valid press ok
now looking at the gui make sure Use ac3 decoder is tick
downconvert sample rate is ticked
in the toolame dropdown box make sure it says mp2 leave the rest alone
now press copy command to clipboard
goto start
run
and right click paste
press ok
if all the settings are correct a black box will open and the ac3 will be transcoding to mp2
if not check the boxes are ticked
if ok leave it to do its thing
once the black box has disappered close besweet
open heada3che
hopefully you put all the dlls in the heada3che folder other wise you will get error messages
so make sure you do that
done it ok lets go
press source file
find the new mp2 file we just made
change the destination format to mp2
press start
thats it once its finished close headac3he
for your info
things are going to start looking messy inside your folder so if you want
you can delete some things
goto the folder where youre original avi file is
you can delete the ac3 file
and the mp2 file without the .2 in it
ie you will have two file names the same one with .2 on the end keep this one
this is so we dont get confused later
open tmpegnc
close the wizard if it opens
press the video source browse button
find the file we made with nosound on the end ie viewfromthetopnosound
now if you had gone to the kvcd page and downloaded all the templates this will help
if not go do that now
done it right lets go
now im afraid im not in front of your pc doing this for you so i hope i explain well
press load
you will see a load of files in front of you some starting with kvcd
right this is trial and error stuff now pick the first one begining with kvcd highlight it press open
now press start what will happen is the preview box in front of you will start encoding
now depending on the make up of the original avi file will effect the outcome of the finished film
so if you look at the box and all you see is a tiny box with film thats the size it will come out
if it looks weird press stop and reload a different template the best result is one that looks like widescreen
i hope that made sense
just press start and overwrite the file
any way let it do its thing depending on your pc specs depends how long this takes
so lets assume its done
press file mpeg tools the first box should be simple multiplex press the video input browse button
and find the new file we just made it will have a m1v extension
press the audio input browse button find the mp2 file with the .2 in the title the output
box will be automatically set to mpeg
press run
let it do its thing
close tmpgenc
open nero
select vcd
untick the create standard compliant cd
press new
find the new file we have made it will be in the original avi folder but will have a mpeg extension.now you have to drag this into the left box dont right click and copy to compliation,a box will appear and a blue line will go across if a warning comes up with not being a compliant vcd ignore carry on
press burn and burn at the speed you want
once finished press the ok box
press done the disk will come out and now to test
put it in your dvd player and hay presto the film kicks in
depending if your dvd player can play vcds that is
How To Change Blogger Favicon
Have you ever tried to change your blogger Favicon. I have tried so many times and made a good research on changing your blogger "Favicon". I searched in google and found out many tutorials for changing Blogger Favicon, but I was not able to change my favicon due to the availability of an easy step by step tutorial.
What is a Favicon?
A Favicon is an .ico file which will be displayed in tabs and windows during each page loads. Here's the example for "Favicon".

Blogger has an yellow icon by default. If you customize this favicon with your own image, you will get a better impression from the readers. Some might think your blog as a real domain.
How Can we Change This Favicon?
1) After you logged on to your account, Go to your Dashboard.
2) Now Click on "Edit html" button under "Design" tab.

3) Now you can see a piece of code as highlighted in the above screenshot.

5) You can find pre-built favicons in freefavicon
6) You have two options, you can use your own image to create a "favicon" or you can select some great "Favicon" from the available categories.
7) Once you are onto freefavicon.com, For uploading your own image, please review this screenshot.

8) The URL you are inserting in to the code should be of the form www.youricon.com/favicon.ico
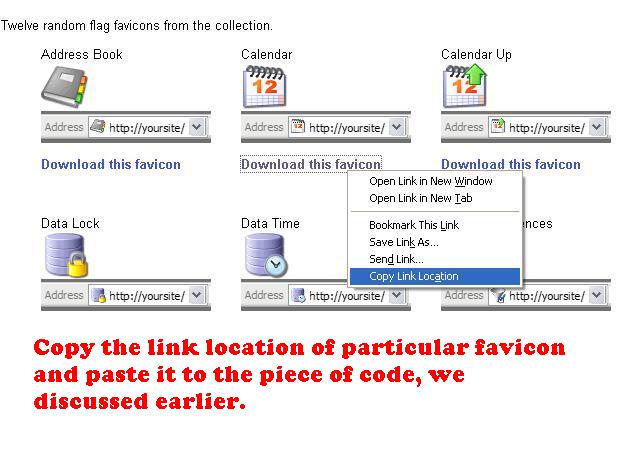
9) If you are opting for selecting a favicon from available categories, review this screenshot.

10) Now click on "Save Template" Go to your blog, Voila!!!
, you have a new favicon now.
What is a Favicon?
A Favicon is an .ico file which will be displayed in tabs and windows during each page loads. Here's the example for "Favicon".

Blogger has an yellow icon by default. If you customize this favicon with your own image, you will get a better impression from the readers. Some might think your blog as a real domain.
How Can we Change This Favicon?
1) After you logged on to your account, Go to your Dashboard.
2) Now Click on "Edit html" button under "Design" tab.

3) Now you can see a piece of code as highlighted in the above screenshot.

5) You can find pre-built favicons in freefavicon
6) You have two options, you can use your own image to create a "favicon" or you can select some great "Favicon" from the available categories.
7) Once you are onto freefavicon.com, For uploading your own image, please review this screenshot.

8) The URL you are inserting in to the code should be of the form www.youricon.com/favicon.ico
9) If you are opting for selecting a favicon from available categories, review this screenshot.
10) Now click on "Save Template" Go to your blog, Voila!!!
, you have a new favicon now.
How To Host Any Kind Of File On Your Blog
We all know that, blogger does not allows file storage other than Picture and text, we can also embedd videos from other video sharing platforms like Youtube. To enable direct down load form your blogger, you should purchase a domain from Google to host your files. How about hosting files for free in your blogger. This article covers all possible solutions to enable file hosting in your blogger to give direct download links to your readers.
What is a direct download?, when a reader click on a particular link in your blog, download is initiated without being redirected to any other web page or file hosting services. This gives your blog a competitive edge over other free blogs. The readers will love this feature. There are two possible solutions for this dilemma without spending a single cent.
1) Host your Files in your P.C
2) The Use Google Sites
Hosting files In your P.C- Turn Your P.C to A Dedicated Server
First if all you need a simple programme to host files in your P.C. The Programme is called HFS(HTTP file server)and you can download HFS from this Link. If you have a third party firewall installed, configure it to allow HFS to the trusted App section. By default HFS uses port 80, if your firewall blocks port 80, configure HFS to any free port like 1024 or 8025.
If you are behind a router, you need to refer the port forwarding tutorials Here . Now you should Test HFS settings.

The next step is to register a free domain from no-ip.com. Go to no-ip.com and Create a new user at No-IP account.
Once you are finished with the registration Log-in to your account and click on “Hosts/Redirects”.
Now Click on "Add" link in left sidebar.

This will help you to create a domain in conjunction with your IP address. Click on "Create a Host" to publish your website.
Now you are ready to launch your site.
You can now decide what page will appear when someone access your site, like the default page.To change the default page,
Hosting files in Google For free
Now we are going to discuss about the simple easy method to host any types of files for free, to enable direct download in your blog. Assuming that you all guys have a working Google account. This site is a phenomenon, go to Google Sites. Google sites helps you to make hosting your files much much easier. You will get 100 MB free storage per google account. If you need 1GB storage, you should have a 10 Google account.
Now sign in with your Google account user name and password. Create a site, it is so easy to do. Unfortunately Google sites does not permits direct uploading of .exe files. No need to worry, we can convert it to a .rar file or .zip file using either WinRar or WinZip, now you can upload it. As your blog getting popular and popular, you need to give more to your readers, so create multiple Google account and, increase your storage as per your requirement. Log in to your site, create file Cabinet page and add your files. Review the screen shot for getting downloading links.

Hosting Document Files With Word-press For Free
Word-press gives you the chance to host your documents. You have 3GB space per Wordpress account. These are the allowed file types: jpg, jpeg, png, gif, pdf, doc, ppt, odt, pptx, docx.

Suppose if you want to start a blog on Ebook downloads, you can download ebooks from torrents or rapidshare and Just upload it to Wordpress, you can give direct download links to your blog documents using this feature.
Think I have helped you a bit.
Happy reading.
mathewf4rr3l
What is a direct download?, when a reader click on a particular link in your blog, download is initiated without being redirected to any other web page or file hosting services. This gives your blog a competitive edge over other free blogs. The readers will love this feature. There are two possible solutions for this dilemma without spending a single cent.
1) Host your Files in your P.C
2) The Use Google Sites
Hosting files In your P.C- Turn Your P.C to A Dedicated Server
First if all you need a simple programme to host files in your P.C. The Programme is called HFS(HTTP file server)and you can download HFS from this Link. If you have a third party firewall installed, configure it to allow HFS to the trusted App section. By default HFS uses port 80, if your firewall blocks port 80, configure HFS to any free port like 1024 or 8025.
If you are behind a router, you need to refer the port forwarding tutorials Here . Now you should Test HFS settings.

The next step is to register a free domain from no-ip.com. Go to no-ip.com and Create a new user at No-IP account.
Once you are finished with the registration Log-in to your account and click on “Hosts/Redirects”.
Now Click on "Add" link in left sidebar.

This will help you to create a domain in conjunction with your IP address. Click on "Create a Host" to publish your website.
Now you are ready to launch your site.
You can now decide what page will appear when someone access your site, like the default page.To change the default page,
- Open HFS and click on “You are in Easy Mode ” to turn it to advance mode.
- Right click on little house icon on VFS and click on “Bind Root to Real Folder”.
- Now you can add files and folder here which you want to make available in your website.
- Next is when your site is ready send the address which you created in NO-IP or step 4 to all your friends.
- You can even see what others are viewing in advanced mode of hfs
Hosting files in Google For free
Now we are going to discuss about the simple easy method to host any types of files for free, to enable direct download in your blog. Assuming that you all guys have a working Google account. This site is a phenomenon, go to Google Sites. Google sites helps you to make hosting your files much much easier. You will get 100 MB free storage per google account. If you need 1GB storage, you should have a 10 Google account.
Now sign in with your Google account user name and password. Create a site, it is so easy to do. Unfortunately Google sites does not permits direct uploading of .exe files. No need to worry, we can convert it to a .rar file or .zip file using either WinRar or WinZip, now you can upload it. As your blog getting popular and popular, you need to give more to your readers, so create multiple Google account and, increase your storage as per your requirement. Log in to your site, create file Cabinet page and add your files. Review the screen shot for getting downloading links.

Hosting Document Files With Word-press For Free
Word-press gives you the chance to host your documents. You have 3GB space per Wordpress account. These are the allowed file types: jpg, jpeg, png, gif, pdf, doc, ppt, odt, pptx, docx.

Suppose if you want to start a blog on Ebook downloads, you can download ebooks from torrents or rapidshare and Just upload it to Wordpress, you can give direct download links to your blog documents using this feature.
Think I have helped you a bit.
Happy reading.
mathewf4rr3l
All Axis Bank Customer Support Numbers
Phone Banking ServicesTo access Phone Banking services from anywhere in India, from a Landline or Cell phone please dial any of our following 3 Toll Free Phone Banking Numbers:
|
How To Contact ICICI Customer Care
ICICI Bank E-Mail Support( For general Queries)
If you are a Corporate Customer, use this Link
If you are a Corporate Customer, use this Link
| 24hr Customer Care numbers for Retail Customers | ||||||||||||||||||||||||||||||||||||||||||||
|
Subscribe to:
Posts (Atom)
